

How To Design A Jersey In Photoshop
Design 100 objects at once in Photoshop
Have yous e'er thought how crawly it would be to remove all repetitive routines from your daily design work? Or how to become build some kind of graphic avails library in Photoshop – similar to Flash, Illustrator, Afterwards Effects and other Adobe apps? And wouldn't it be slap-up to have a couple more than hours a twenty-four hour period to add together last touches to your designs?
In this tutorial, nosotros'll attempt to address all three questions, exploring a cool trick that enables yous to work on any number of variations of an paradigm at once. This workflow is extremely useful for games assets, and for GUI designers creating icons. Information technology enables you to piece of work on one object, save it, and let Photoshop distribute all the changes yous've fabricated to whatever number of variant copies.
If you're familiar with Smart Objects, you already know that you tin can have multiple instances of one chemical element. This tutorial volition show you lot how to use Smart Objects in an even smarter manner. I developed the technique trying to mimic an awesome workflow in Later Effects, and it turns out that it works pretty well in Photoshop, too.
This walkthrough assumes that y'all already understand how Smart Objects work, and that you're familiar with Photoshop's 3D toolset. If yous get stuck, you can find a more detailed version in the download for this tutorial, along with the terminal PSD file.
This tutorial is written for Photoshop CS5. Delight annotation that the 3D tools and avant-garde animations are merely bachelor in the Extended edition of the software, and that in CS6, the Animation and the 3D panels have been reworked. For example, in that location's no Document Settings in the CS6 Animation drop-down card: instead, you tin can modify Frame Rate via the Animation panel. You may also have some problems opening CS5 PSDs with Photoshop CS6. However, the underlying ideas – and cadre workflow – of this tutorial remain the same for both.
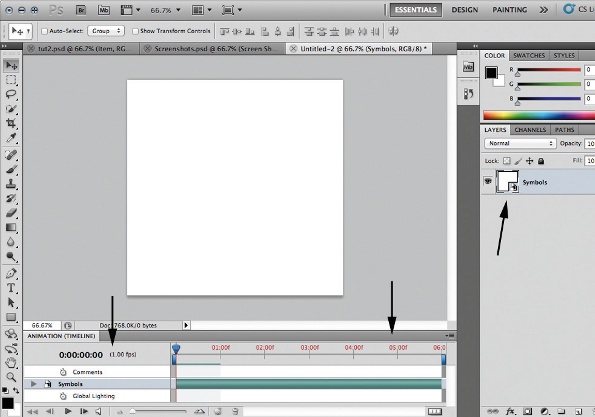
START Certificate Get-go past creating a 512x512px PSD file. Go to Window > Animation. Open the menu in the Animation palette. In Document Settings, set Duration to six frames (that is, 00:00:06:00) and Frame Rate to 1 fps. Convert the only layer to a Smart Object. Proper noun it Symbols.
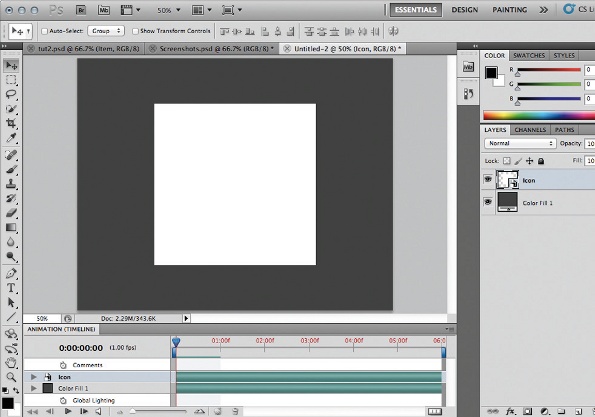
ii Smart Objects Add a new layer and convert it to a Smart Object. Name it 3D. Catechumen both layers into new Smart Object named Icon. Set your Canvas Size to any dimensions you desire (I'g using 1000x800px here), and add a background Fill Layer with a nighttime grey colour.

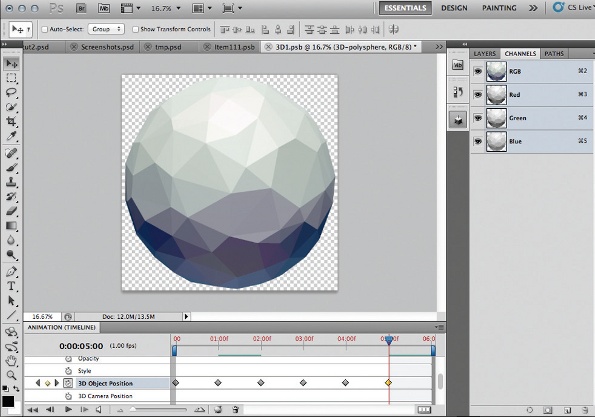
3 3D layer I've prepared a 3D file yous can use. It's a modified depression-poly sphere. Within the Icon Smart Object, open up the 3D Smart Object. Import 3D-polysphere.obj as a new layer. Calibration it to fit the document. Clear its Diffuse texture slot. Delete the background layer.

4 Animate In the Animation window, ready Elapsing to 6 frames and Frame Rate to 1 fps again. Detect the 3D Object Position rails for your 3D layer. Click the stopwatch. Rotating the sphere randomly with the 3D Object Rotate Tool, set up a keyframe for each frame of the blitheness.

v Diffuse texture Add together a new texture to your 3D object's Diffuse slot. This is actually another Smart Object: open up its contents. Set Duration and Frame Rate equally earlier. Add a Color Overlay Layer Style. Observe the Fashion track in the timeline. Click the stopwatch.
6 3D style Changing the Color Overlay colour every frame, prepare keyframes equally before. Get back to your 3D Smart Object: the sphere rotates and changes colour every frame. Conform its parameters as yous like: I gear up Reflection, Gloss and Shine and added a gradient to the Surround slot.
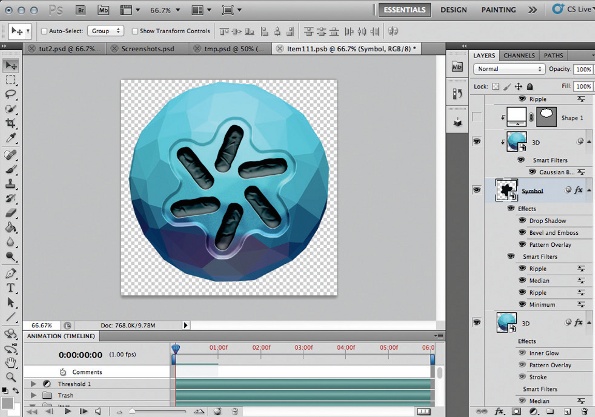
7 Symbol Get back to your Icon Smart Object and swoop into the Symbols Smart Object. Ready Duration and Frame Rate equally before. Draw a shape of nearly 256x256px in size: I'm using a glyph here. Make sure its colour matches the Diffuse map colour of the 3D object in the first frame.

viii Symbols library Let's create a library of symbols. Add more shape layers in dissimilar colours. Brand sure all the shapes are the aforementioned size and centred on the canvas. Brand each layer one frame long. Sequence them then each is visible in a unlike frame. Get out the final frame empty.

ix Layer style Get back to your Symbols Smart Object. Apply whatsoever Layer Styles settings you like: I'm using Drop Shadow, Bevel and Emboss and Pattern Overlay. You tin can as well apply filters: I'chiliad using Ripple and Median to brand the symbol look less similar a vector shape.
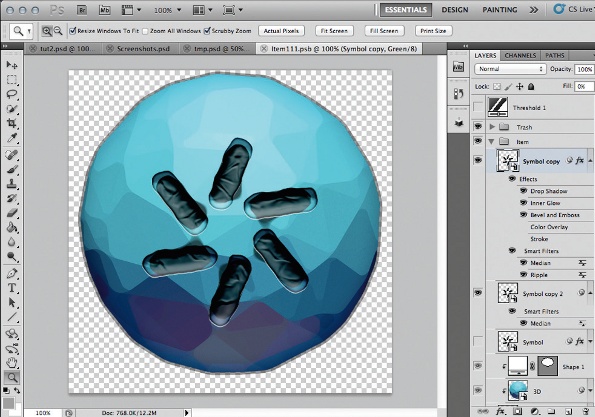
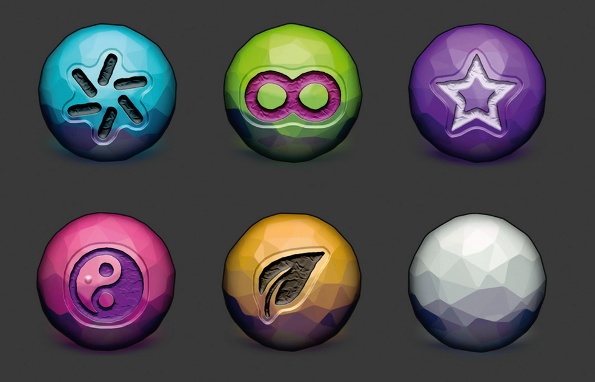
10 Symbols combination The beauty of this workflow is that you lot can brand changes to any or all of the Smart Objects. The recessed area shown above is created by duplicating the Symbols object, applying Minimum and Median filters, and setting the Make full value of the layer to 0%.

11 Filters for 3D Let'southward stylise our 3D sphere a bit more. I love applying the Median filter to vectors and 3D layers – it makes them look less digitally perfect. Via the Layer Styles window, y'all can as well add a semi-transparent black outer Stroke and some night Inner Glow, to make the element'south edges more visible against any background.
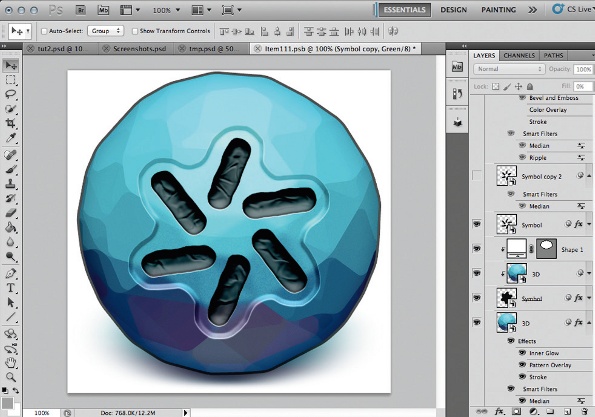
12 Style alternative Hither's an example of the way you tin can test out variant styles. Duplicate the Symbols layer, with Fill up set to 0%. Articulate its Layer Styles settings, apply a Median filter with a higher Radius value, and change Fill to 70%. Voilà: an instant smudged pigment upshot.
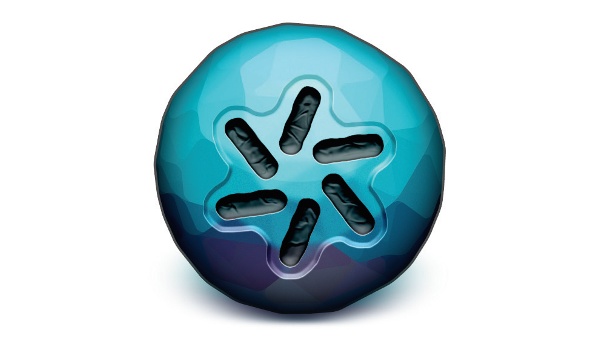
13 Shadow Add a drop shadow to the sphere past duplicating the 3D layer, scaling the sphere downwards, and moving it to the human foot of the original. Utilise Gaussian Blur and Motion Blur filters until it looks similar a shadow. In Layer Styles, apply a black Color Overlay to make information technology less saturated.

xiv Scheme Permit's accept a wait at a schematic view of the project file. The workflow may seem a flake disruptive at get-go, merely if you keep in mind the elementary formula Element Number = Frame Number for every Smart Object, y'all should observe that it quickly becomes intuitive.

15 Master document Let'south work on the main PSD certificate again. Save and close the tabs for all of the Smart Objects you have open up. Scale the Icon object down, duplicate it five times and adapt the copies equally shown in the screenshot above.

xvi All objects together In the timeline of the Animation window, arrange the Smart Objects' elapsing bars so that in the start frame of your blitheness, Smart Object #1 is on its ain first frame, Smart Object #2 is on its second frame, Object #3 is on its third frame, and so on.
17 Update all objects at once Change an element in the Icon Smart Object: for example, in Layer Styles, add together black Inner Shadow to the 3D object. Set the Angle to -90°, and conform Size and Distance to get a soft shadow effect at the bottom of 3D sphere. Save and shut.
xviii Changes applied Your master PSD document can take a couple of seconds to update itself, but the moment it is updated yous volition see that the inner shadow is practical to every object on the scene. This is a quick mode to make edits to multiple objects, making your PSD files piece of work for y'all.
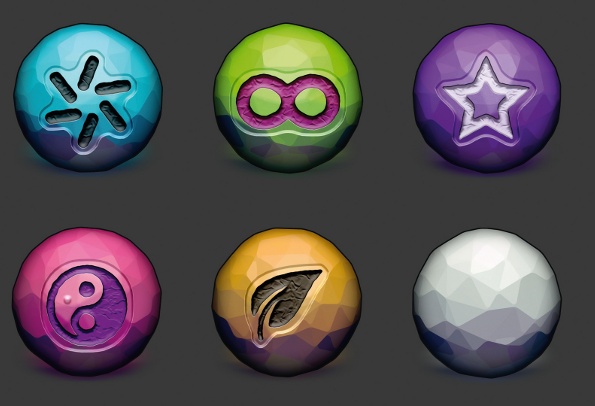
FINISH Update together This is simply the start of the design procedure. Yous can now tweak every aspect of the set of objects in a non-subversive way: for instance, to adjust the colour or lighting of the spheres, or the filters and Layer Styles for the symbols. The moment you lot salvage the Smart Object y'all are working on, all the objects volition update at in one case.
Related articles
Source: https://www.creativebloq.com/design-100-objects-once-photoshop-5132834
Posted by: cartwrightdarpre1947.blogspot.com
0 Response to "How To Design A Jersey In Photoshop"
Post a Comment