

How To Enable Perspective Ruler In Clip Studio Paint
One of the things many of u.s. take difficulty learning is "perspective."
In this short article, I am going to explain the basics of perspective.
Each particular is non too difficult.
Learn the basics and know your enemy!
What's "perspective?"
What'due south "perspective?"
Perspective gives athree-dimensional feeling to apartment images.
To attain this effect, you need to describe nearer objects larger than further objects.
Linear Perspective
Linear perspective is the most well-known blazon of perspective.
Draw objects smaller as they become further away until they disappear at a certain "vanishing point."
Linear perspective hasvanishing points, and everything else is based on the lines leading to those vanishing points.
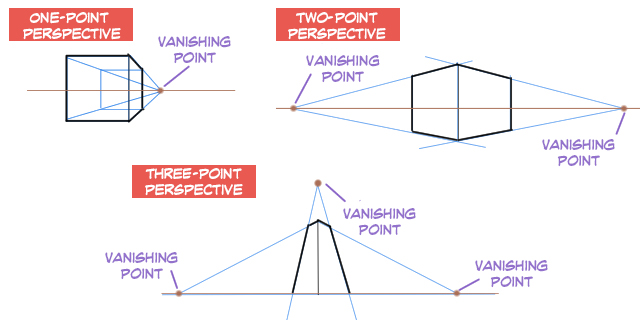
● Ane-Indicate Perspective
This method has a single vanishing indicate, and everything converges towards that one single point. Ane-point perspective is the simplest form of linear perspective and usually used for rooms and corridors.
● Two-Indicate Perspective
This method hastwo vanishing points.
2-point perspective is oftentimes used for drawing exteriors of buildings.
One feature of two-indicate perspective is that all the vertical lines areperpendicular to the horizon.
● Iii-Indicate Perspective
Equally y'all may imagine, iii-point perspective hasthree vanishing points.
By adding a third vanishing point above (or beneath) the vanishing point of the two-indicate perspective method, you tin make the photographic camera wait upwards or look down at an object.
When drawing from these angles, a form of distortion called "tiptop distortion" will course.
Iii-point perspective is a method for cartoon such meridian distortion.
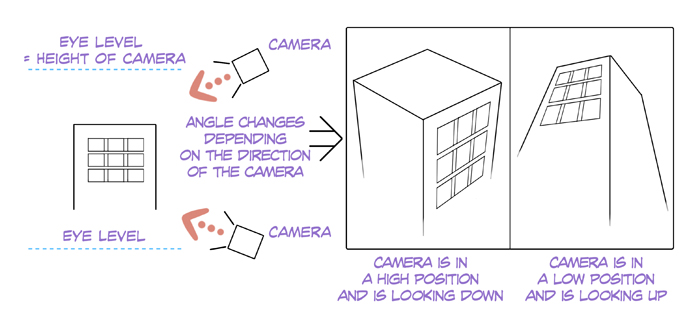
Middle Level
The phrase "eye level" is something you lot will run across many times as you larn most perspective.
In art, centre level is thesummit of the horizon.
It is like aline that shows the height of the camera in photography.
Setting the heart level helps make up one's mind the overall structure of your illustration.
For example, setting the eye level to the same eye level as the character makes the photographic camera look direct at the person.
● Eye Levels and Horizons
It's also good to keep in mind the relationship between the centre level and the horizon.
The eye-level is the same as the horizon if the camera is looking in the same direction.
Raising the centre level volition also heighten the position of the horizon.
In turn, lowering the middle level will also lower the position of the horizon.
Things to Have Care When Using Linear Perspective
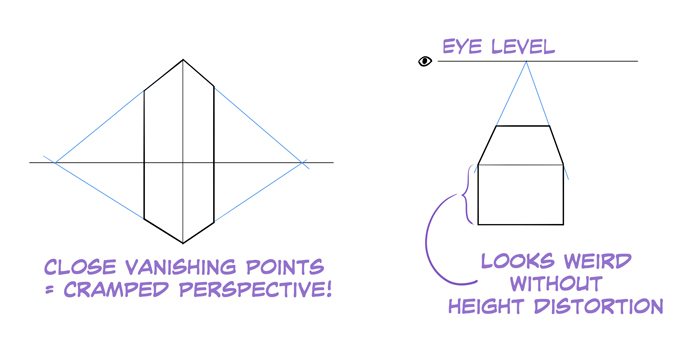
● Vanishing points should not be too shut
If there are multiple vanishing points, putting them close together volition result in a distorted illustration.
Y'all should generally have a reasonable distance between vanishing points.
● Be careful of the position of the eye level
The position of the eye level in one-point perspective and 2-point perspective should non be too high or too low.
Suppose y'all raised the eye level and horizon positions in a ane-point perspective like the post-obit analogy.
Y'all're supposed to exist looking down at the box, just there's too much height baloney to make it await natural.
A Beginner'south Guide to Perspective: Exercises
Let's put our new knowledge to the test using simple boxes.
Practice drawing these to meliorate your understanding of perspective in activity.
Here, nosotros volition be using two-point perspective.
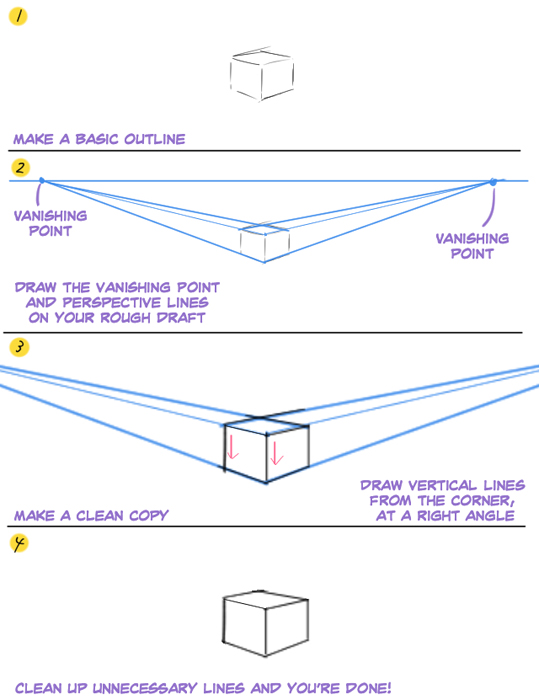
(1) Draw a rough draft
Kickoff, depict a crude draft of the box.
Drawing from a rough sketch is the best manner to determine the overall structure.
You lot should already be thinking about where the vanishing points and horizon should be.
(two) Determine your vanishing point
Draw a rough draft of the vanishing point, horizon, and the lines from the vanishing point.
Extend the border of the box. The vanishing point is the point where the extended line meets the horizon.
Determine ii vanishing points and a horizon that is parallel to the screen. Make sure to keep a distance between the 2 vanishing points!
(3) Draw a line
Draw a line from the acme of the box to the vanishing point.
When using two-point perspective, draw your vertical lines perpendicular to the horizon.
Utilise a ruler for direct lines.
(4) Done!
Erase all unnecessary lines, and you're done! If y'all can draw a box, you can employ the same method to depict buildings.
You can even use it to make a crude sketch for characters with different perspectives.
Splitting
Drawing a diagonal line splits an object fatigued in perspective.
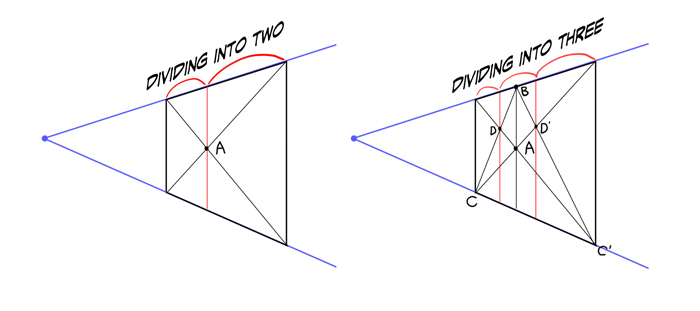
● Dividing into two
For i-point perspective and 2-point perspective, describe a line perpendicular to the horizon. Move this so that information technology passes the center of the diagonal line (point A) to split the object into two equal parts. For three-point perspective, connect the vanishing signal that you used to express meridian with the center point of the diagonal line.
If you can dissever the object into 2, then it tin be divided into 4 using the same method.
● Dividing into three
Y'all tin add some other line to split up the object into three parts.
Connect betoken B and a corner (point C and point C'), so use the two points that cantankerous the diagonal line (point D and point D') to draw a line. Doing this will dissever the object into three equal parts.

● Other methods of splitting
Draw a line parallel to the horizon that passes through betoken Due east, and split this like the following analogy. Use the point where they meet with the line that passes through bespeak F to split up the object. Doing this is useful when you want to split an object into many equal parts.
An Advanced Guide to Perspective: Aerial Perspective and Colour Perspective
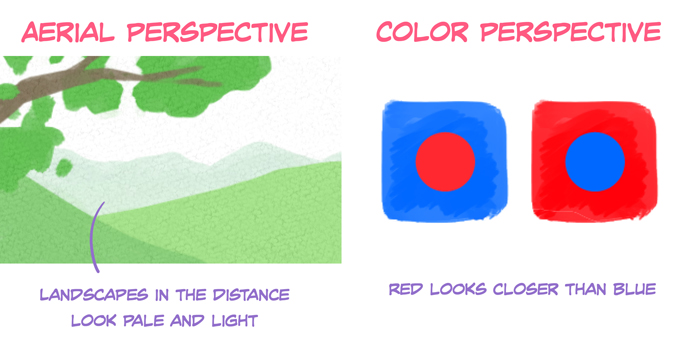
Linear perspective isn't the only style to show altitude.
By drawing objects closer to y'all in darker colors, you can use what is chosenaerial perspective to evidence space.
When y'all expect at vast landscapes (east.g., mountains, buildings in cities), you will notice that the further they are, the more blurred they look. They also wait desaturated and pale.
By cartoon faraway objects similar this, y'all can show spatial depth.
It's as well good to utilizecolour perspective, which is some other way of showing depth by changing color depending on the distance.
When you place two shapes of the same size, ane in cerise and 1 in blue, the red shape will appear to exist at the front. This is because warm colors tend to pop more cool colors.
This color perspective is helpful when considering the overall structure and color scheme.
For instance, if you want something to stand up out,employ cherry-red rather than blueish.
Written past: Yusuke Yamanaka (山中ユウスケ)
Produced by: Sideranch Inc.
Source: https://www.clipstudio.net/how-to-draw/archives/156960
Posted by: cartwrightdarpre1947.blogspot.com
0 Response to "How To Enable Perspective Ruler In Clip Studio Paint"
Post a Comment